Learn how to set up basic recurring billing for your customers
If you have not installed the Stripe plugin and saved your API keys, please kindly refer to Stripe Payment Gateway Set-up documentation before proceeding with this documentation.
Login to your Stripe Account and click on Developers to go to the developers page.
Click on Webhooks and click on +Add endpoint.
Add your endpoint URL. Your endpoint URL consists of your site name followed by /?wpdating-api=WC_Gateway_Stripe. For example https://www.demo.com/?wpdating-api=WC_Gateway_Stripe
Then, click on +Select events.
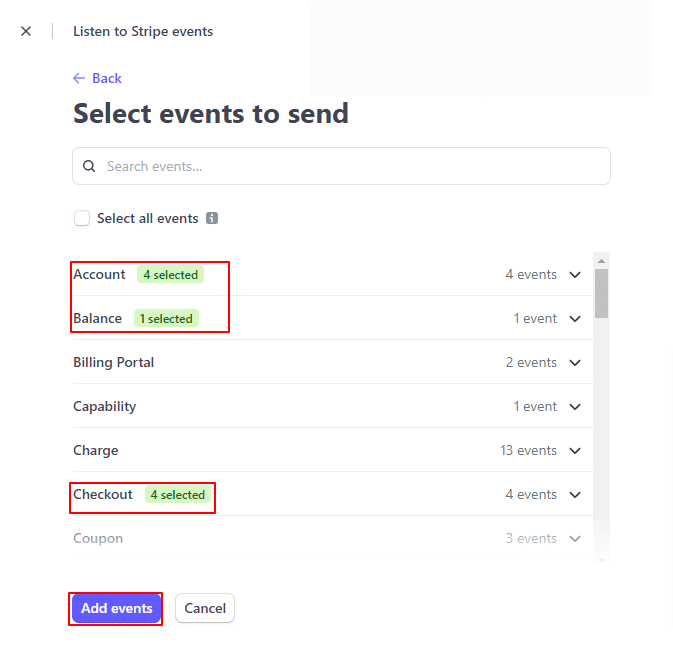
Now, in the Select events to send page, select all from Account, Balance, Checkout, Customer, Payment Intent and Payment Method.
Then click on Add events.
Now, click on Reveal to view your Signing Secret.
Copy the Signing Secret and paste it in the Signing Secret filed in the DSP Stripe Settings page at DSP Admin >> DSP Stripe in your WordPress admin panel and click on Save Changes.
Using Stripe Product ID to link Stripe with Membership Plans
At your Stripe account dashboard, go to Products and click on +Add Product.
Now, enter all the Product Information. Enter the product Name, Description, Image, Price, Currency, Billing Period and click on Save product.
Copy the API ID of the product to be used for the membership plan.
Now, paste the API ID at Stripe Subscription Plan Id in your Membership Plan edit page at DSP Admin >> Membership and click on Save Changes.
Congratulations! You have successfully integrated Stripe into the membership plans of your site.


